The DIY Temporary Wood-Fired Pizza Oven Build: Tips, Notes and Photos

As noted in my temporary pizza oven writeup (and reiterated in my “Pizza Obsessives” interview by Slice – check it out!), making an effective pizza oven can be as simple as stacking blocks. Use a quickly made jig to build an easy brick arch roof, and screw a couple pieces of angle iron around it to hold everything together. That’s it – pizza time, all the time.
The ease of the design was demonstrated recently by Thomas Niccum, who used my writeup to reconstruct his own oven. Total time from construction to eating pizza? 10 hours – and that includes transporting a pallet of cinderblock into the back yard one by one.
Niccum was kind enough to send detailed notes and photos of his build. They’ll help you put one together, too. Maybe this weekend – it is summer, after all.
I decided to build the stand out of concrete block, and add a layer of insulation (IsoBoard 2″ good to 2300 degrees).
My long term goal is to build the Forno Bravo Pompeii oven, but I felt that the oven you showed would be a good learning experience. All of the brick and block should be repurposable for the Pompeii.
I did this today, by myself… most of the work was hauling the bricks from the front of the house down a hill, around to the back.
Day 1:


Day 2:


Finished up in time for lunch…
Pizzas were great – I think I need to get the oven hotter – they were taking 4-5 minutes to cook fully. but they still tasted fantastic.
Start time to finish – roughly 10 hours. Five hours Friday night – much of that was hauling the concrete blocks and fire bricks from the front of the house to the back. I did all of that myself. Also got base assembled and hearth laid.
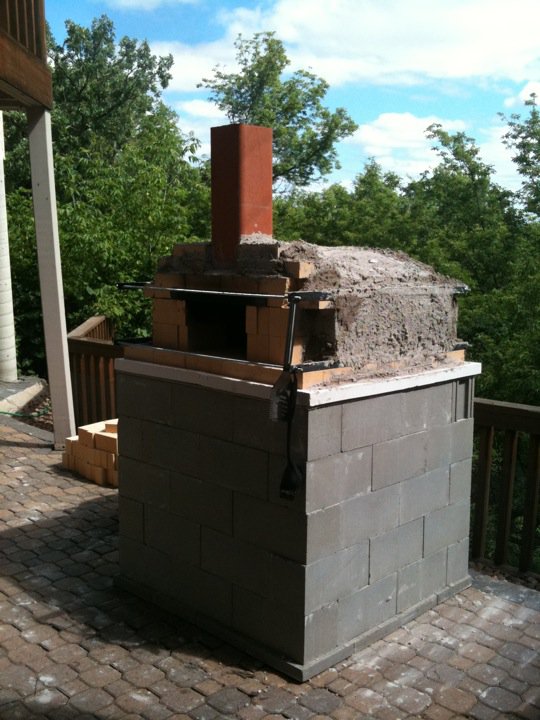
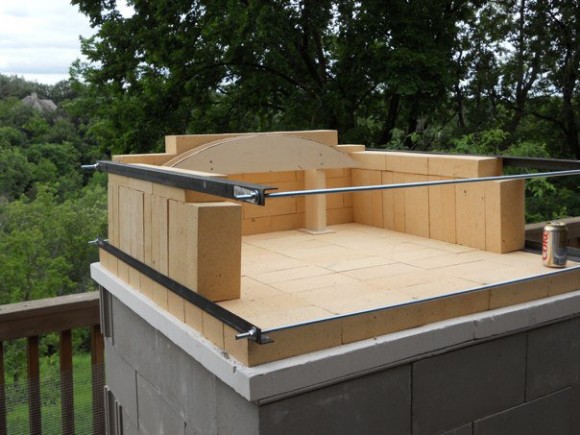
9-2 (5 hours) on Saturday had 2 friends assist. Built side walls, drilled angle-iron, built curved roof jig, built roof and applied the mud. Fired oven for one hour to heat/cure.
Pizza in belly by 2:10pm…
Some construction notes:
Materials:
1. I used 190 Firebricks (one sacrificed to make “shards” for roof shimming. (about $1.80/ea)
2. Used 1 50# bag of refractory clay and 1 bag of sand.
3. 60 concrete blocks ($1 each)
4. 5 48″ angle iron
5. 4 48″ threaded rod
6. 4×4 durock
7. 4×4 IsoBoard (expensive! $12/sf)
8. 8.5×8.5x 24″ Clay flue linerTools that came in handy:
1. Angle grinder with cutoff blade (threaded rods, angle iron)
2. Circular saw with diamond blade (Durock, Jig legs)
3. Skill saw (jigsaw) – Jig formNotes:
1. I did add another set of bricks on each side of the door to make the opening smaller, it seemed too large to me (that took six bricks)
2. Oven was still pretty warm 4 hours after fired died out. I’ll try to take some temps with my infrared thermometer of heat decay
3. Clay/Sand – we did a 1:1 mix. It seems very grainy and brittle – lots of cracks. May try another batch with less sand and put over the current one.
4. Clay flue liner cracked within a few minutes, seems to be holding together, but maybe we need to heat more slowly the first timeBase construction
1. Base is 5 courses of standard concrete block (48×48″) with a line of block down the middle of the interior
2. on top of base is Durock cement board
3. on top of Durock is a 2″ layer of IsoBoard – a refractory insulation – should help keep the floor hot longer
4. Floor of oven is on Iso BoardFuture experiments:
1. Wrap exterior in ceramic fiber insulation blanket while running… try to get heat up.
2. Build a door
3. Fire to heat then record temp decay with as is, and with blanket, and with door. Want to test feasibility of pre-heat then baking bread or roasting chicken with out fire burning.
UPDATE:
I got an email and a photo from Tom telling me about his attempt to cook a whole chicken in the oven. From the description and the looks of the photo, I think he got it right on the first try:
Tried roasting today… have to keep a small fire going as the temporary oven doesn’t hold enough heat. Otherwise, fantastic.
Did two chickens. One in a roasting pan, one “Beer Can” style. Plus a dish of potato, carrot and zucchini.
Best chicken I’ve ever cooked.
Took about 90 minutes to roast, stayed nice and moist, outside was deeply browned.

