Improve Your Photography with a DIY LED Ring Light

Ring light: a source of light for photography that encircles the camera lens completely. It creates a shadow-softening effect on the object or person being photographed, a warm and natural alternative to the stark standard camera-mounted single flash look. Normally the tool of professional photographers, ring lights are becoming more accessible to hobbyists, with models ranging from around $40 to well into the hundreds of dollars.
But for those of you who are taking macro or close-up photos, why not build your own? The cost of a DIY unit runs just over $25, and will take less than an hour to assemble. And the satisfaction of building the project on your own is impossible to match.
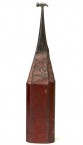
Jani ‘Japala’ Pönkkö of Metku.net pieced together a fantastic set of instructions using 12volt LED “eye” lights seen on current BMWs. By coupling a few together and mounting them into the lid of a CD spindle (like when you buy a 10 pack of blank CDs at Office Depot), you have a lighting system that can be mounted to a threaded adapter and screwed onto your favorite camera lens. Check his plans here.

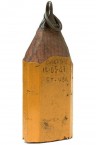
Instructables user nygma2004 took the project one step further and wrote up plans for a 9v battery pack, conveniently tucked into a standard Altoids container. He’s using this as a way to get shots of his model railroad cars and locomotives – something I can identify with well. Read his how-to here.
Convenient, cheap lighting that gets great results. I love it.
You need the following:
– T10 21-LED White Light Car Angle Eye (70mm Diameter) from Dealextreme
– T10 24-LED White Light Car Angel Eye (90mm Diameter) from Dealextreme
– T10 39-LED White Light Car Angel Eye (120mm Diameter) from Dealextreme
– Big Altoids peppermints box from local supermarket
– Old laptop power supply “borrowed” from work
– 3.5 mm stereo plugs and socket, 3 each. I used a socket which has screw mount, so it is easy to fit into the box.
– 2.5 mm DC socket that fits your power supply plug
– TS7812 1A 12V fixed voltage regulator
– 9V battery clips
– Adapter ring, my Canon ESO 300D has 58mm ring (easily found for Nikon, Pentax and all the other DSLR makes)
– Some cable


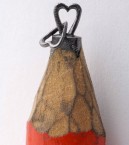
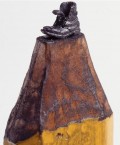
Micro-Scale Pencil Lead Sculptures by Dalton Ghetti
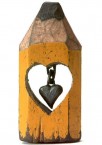
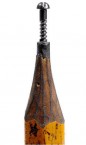
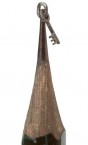
 Dalton Ghetti makes art from an EXTREMELY small medium: pencil lead. With the steady hand of a surgeon and some obviously super sharp tools (I’d love to see his kit), he transforms writing instruments into tiny sculptures, including mind blowing links of “chain.” Originally from Brazil but based in Bridgeport, Connecticut, he spends months to years on each sculpture. People in the New Rochelle, NY area can check Ghetti’s work close up and personal at the Brother Kenneth Chapman Gallery, Sept 8, 2010.
Add me on twitter to keep current with all the DIY projects you can handle


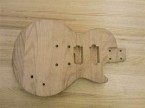
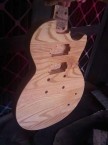
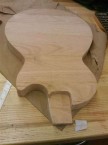
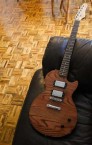
Machine Your Own Electric Guitar

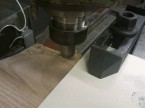
Machine Your Own Guitar: Another awesome DIY guitar project to add to the “how to build a guitar” list – this one is a bit more complex, using tools that you’ll likely only find in heavy duty workshops (mill, band saw, drill press, extra long drill bits). But for someone who has access to their high school/college/work workshop, the write up steps you through all the instructions in a very clear way.
The shape of the wood slab forced the guitar to be designed in a way that you don’t see often, with the grain perpendicular to the strings. I love the unique way that ends up looking, but can be a bit dangerous as the tension from the strings put a lot of strain on the grain and can cause cracking/breaking.
Because the creator already had a neck from another guitar, he was able to make this one for about $100 – but says that using better wood and electronics would bump the price up to the $450-$600 range. Still, a very decent price for a custom, sweet looking guitar.

Materials:
– Approx. 1.5″ thick hardwood slab, large enough to accommodate your design
– Prefabricated bolt-on guitar neck
– Double coil humbucker pickups ($33 for two on eBay)
– Tune-o-matic bridge ($12 on eBay)
– String tail-piece ($6 on eBay)
– Jack plate ($3 on eBay)
– 1/4″ mono jack
– 2x knobs ($3 each on eBay)
– 2x 100k audio-taper potentiometers (pots)
– Les Paul rear plate ($6 on eBay)
– Strap pins
– Sacrificial piece of 1/4″ to 1/2″ thick plywood
– Wire
– Solder
– Triangle wood wedge
– Large sheet of paper
– Wood conditoner
– Wood stain
– Urethane wood finish
– Paint thinner
– Cloths
Tools:
– Mill
– Assorted mill cutters
– Assorted Forstner bits
– Mill slot-clamps and assorted clamping bars/rests
– Drill press*
– An extremely long 3/8″ drill bit
– Band saw**
– Sandpaper
– Sanding block or palm sander
– Wood rasp
– Soldering Iron
– Bubble level
– Pencil
– Protractor
– Mallet
Five Tips For Long Bike Rides, and The Rosarito to Ensenada Bike Ride (including Tijuana)

About ten years ago, during a brief residence in San Diego, I partook in a fun local tradition that dates back to 1971: The Rosarito to Ensenada bike ride, a 50 mile trek through northern Baja California. I snapped photos throughout the ride on a very rudimentary digital camera and posted them along with a writeup on one of my old sites (now available here). It was such a fun experience that I’ve decided to share it on the DOIT blog.
This bike ride is actually quite easy and well organized. I highly encourage everyone who has the chance to do it. But first…
Five simple but important tips for anyone embarking on a long bike ride:
- Map. Bring one. One of the great things about riding a bike is the freedom to take any path that catches your eye – but when you find yourself headed off the main road, you should make sure you know how to get back.
- Phone/charger. Amazing that cellphones weren’t very common little more than ten years ago. Keep it handy for emergencies. I keep mine switched off and tucked into the furthest part of my bag so I can enjoy the ride with that unplugged feeling.
- Food. A few Powerbars can make a huge distance when you realize you still have a couple hours before the next gas station.
- Water. Even riding at a slow pace is physical work. Keeping hydrated can not be overstated.
- Jacket. Shifting weather, setting sun, even entering a forested area can cause a big temperature drop. A lightweight biking jacket or windbreaker can be your best friend to keep you warm and dry.
And one bonus one:
- Training. If you know you have a ride coming up, even a few sessions around town can be a big help. If you can’t ride outside, use the exercise bike at the gym. You don’t have to go to Armstrong-esque levels, but being conditioned can make your ride much more enjoyable and is not that hard to do.
Home Built Extreme Fat Tire Bicycle

Bike projects are awesome. And it doesn’t get more awesome than this: a home-designed and built mega-fat wheeled bike. Capable of traversing soft sand with great ease, this thing looks like it will take you just about anywhere.

This crazy vehicle was created by Instructable user marple200, who describes the project as a combination of wanting to design and build a bike, and to learn to weld. He handled both in one of the best ways ever.
The two big challenges with his design were creating forks to fit the oversized tires, and engineering a system to allow the chain to reach the gear outside of the tire. The wheels on this beast are from a Yamaha ATV, and the frame is pieced together from a existing bikes. The issue of the forks was created using some rigid electrical conduit pipe and scrap pieces of bike carrier racks found in a dumpster behind a bike store.

The drivetrain issue was sorted out in a pretty novel way: a jack shaft/transfer hub. The pedals drive a chain that is mounted to a raised gear behind the bike seat. The gear turns a spindle that stretches to the outside of the tire and is connected to a second gear on the rear wheel. All of the mounts are creatively sourced pieces of donor bicycles.


The write up is a good example of the capable and creative abilities of the bike’s inventor. It’s one of those projects that gives me that awesome inspired feeling to drop everything and get into my workshop. I’m itching to get that bike trailer sound system started…
Extreme Fat Tire Bicycle on Instructables.

High Speed Photography Using Laser Triggers

One of the fun capabilities that the CHDK hack for Canon point and shoot cameras enables is super fast shutter photography. By snapping the shutter at 1/10,000th of a second (or faster), you can freeze moments that are imperceptible to the human eye. Speeding bullets, balloons popping, or one of the more common shots, splashing water.
Once you have a camera that can stop time, you need a way to tell it exactly when you want to do so. Instructables users SaskView has created an awesome solution to that problem by building a laser trigger that causes the shutter to actuate when the beam of light is broken. What’s more impressive is that he’s sourced most of his parts from a 99 cent store – this is truly a lost cost/high return project.

Laser Triggered High-Speed Photography – More DIY How To Projects
Materials
I got the following at my local Dollar store (each item was actually $1.25: talk about misleading advertising!) Laser pointer Door chime USB Cable Magnets Clamp Shelf brackets Mini-tripod Self-Adhesive backed Velcro Small picture frame (for the plate glass insert) Eye drops (for the dropper bottle. I poured out the contents as I believe anything purchased at a dollar s…The Camera
You’ll need a Canon camera because we’re going to temporarily modify its firmware using the Canon Hacking Development Kit. CHDK is loaded onto the memory card inside the camera, allowing us to override most of the camera’s functions, turning a cheap point and shoot into a highly adjustable way-cool time freezer.Currently there are 47 Canon cameras that CHDK will work wi…The Circuit
At the bottom you’ll see a link to a pdf containing the schematic. To trigger your CHDK enabled camera we’ll be using the USB remote function. In this case we have to use it via the ‘syncable’ method, which is lightning fast compared to the normal USB remote. The syncable remote also operates differently. It triggers the camera on the falling edge instead of the risin…The Laser
The laser pointer has a momentary switch but I wanted a slide switch that would allow the laser to remain on without me holding the button. The Dollar store magnetic door chime not only had the slide switch that I wanted, but also it used the same kind and number of batteries that the laser does. This was cheaper than buying just a switch from an electronics supplier. …The Drop Rig
Below is a photo of my setup. Some pieces of wood and some steel shelf brackets clamped to a TV tray. The laser is mounted with the magnets on one of the brackets, and the photodiode on the other. In between and slightly above I’ve velcro’d the eye dropper bottle filled with milk.CHDK Settings: Enabling Synchable Remote
In order for the USB cable remote to work, you have to enable it. With CHDK installed on your camera go into the Main Menu and at the very bottom you’ll see Miscellaneous stuff. Enter that menu and at the very bottom of it you’ll find the Remote parameters menu. In that menu set Enable Remote [.] Make sure there is a dot inside the square brackets, meaning it’s enable…CHDK Settings: Extra Photo Operations
Now go into the Extra Photo Operations menu at the top of the main menu and set: Disable Overrides [disable] Include AutoIso & Bracketi [.] Override shutter speed [1/10000] Value factor [1] Shutterspeed emun type [Ev Step] Override aperture [5.03] Override Subj. Dist. V [350] Value factor [1] Override ISO value [80] Value factor [1] Force manual flash [.] Power of flas…Adjusting the Camera Settings
Normally you would be triggering an external flash, while the shutter is open using a cable release with the camera in ‘bulb’ mode. Once the flash goes off, you let the shutter close. This requires the room to be darken because the shutter will be open for many seconds. In this setup you can have the room lights on because the flash and shutter are triggered at the sam…Adjusting the circuit
With your drop rig in place mount the photoresistor to one of the steel brackets and the laser on the other one. Adjust the position of the laser so that the droplets fall through the beam. Adjust the position of the photoresistor so that it’s illuminated with the laser. Power up the circuit. LED1 will light up, indicating power. Before we begin using the eye-dropper,…
Reverse Engineering Apple’s iPhone/iPod Charger System Secrets
Third party manufacturers that want to make iPhone/iPod charging devices have to agree to a secret hardware setup that will allow the devices to work, and promise to not disclose what components and specifications are needed to make a charger work. Engineer/hacker/braniac Ladyada (of adafruit.com fame) disassembles a few charging devices to investigate the exact resistors used, and how a wall charging device (AC) differs from a battery charging device.
Read more of her notes and explanations about USB charging, the differences in iPhone chargers over the last few generations, and a great photo of the innards of an iPhone wall jack.

Adafruit sells a variety of electronics kids: Arduino supplies, breakout boards, power supplies and more.
If you want to build your own battery-powered Apple charger, get the adafruit MintyBoost kit here.
Two other fun and hilarious electronics kits from them: Tweet-a-Watt and the Digg Button Kit.
One part of the video of particular interest is the soldering blower unit that Ladyada uses. Designed to allow for the teeny-tiny components to be soldered or removed safely instead of being bashed with a blazing hot metal iron tip, this thing melts the solder with hot air, so you can then safely manipulate it as needed. She uses the Hakko 851 hot air soldering station – it’s not cheap, but I think I need to get one of those things.

The 851 hot air rework station is ideal for soldering and desoldering small surface mount chip components, heating heat-shrink tubing, and other local heating operations.
• adjustable temperature control from 100°C to 540°C (212°F to 1004°F)
• ultra-light setting for air volume control
• ESD safe by design
Les Paul vs Thermite: The Catch It Keep It Episode That Haunts Me
On Catch It Keep It, I had the weekly challenge of designing and building an insane method for destroying an object of considerable value, and then figuring out and building a solution to the same challenge in order to show the contestants that the objective was not impossible, should they fail.
Being who I am, I often found my solutions breaking the “keep it simple” rule – partially because the contestants usually took the simple route, and partially because I wanted these things to be awesome. That created situations with considerable potential for failure, when failure really wasn’t an option. But the show was real, and just like in real life sometimes things don’t go as planned…

Episode five was the Les Paul challenge. Who doesn’t drool over the idea of owning a heavy, thick slab of rock lore? I sure do (although, sadly, the prizes were only for the contestants). The method of destruction? Surround the guitar with 100 lbs of thermite – a compound that burns at 4500 degrees. That’s a LOT of thermite – we had to special order the materials (aluminum powder and iron oxide) due to the quantity requested.
As the episode geared up, I had two solutions in mind: surround that heavy, thick guitar with a heavy, thick box, and shield the whole thing with ceramic tiles and sand (interesting aside: I successfully fused sand into glass during testing), or mechanically extract the guitar from the stage. The contestants wisely, but boringly, chose a box solution – essentially building a fortified dog house, not the most exciting build to watch for an hour, but it had the best potential for winning. Thankfully, they added a small external cooling system to keep things interesting; I thought Bruce’s idea to wrap the entire thing in copper pipe and pump cold water through like a radiator would have been brilliant, but it got vetoed by their team.

I wanted my solution to be big and exciting, and I had drawn up plans that were just that: a pulley system that would loop the guitar and fly it off the stage along a line that ended in a protective net. In order to actuate the lasso/pulley, the system needed a tall tower for a counterweight fall from, connected to the pulley via a block and tackle system that would move the guitar quickly.
It worked great in testing, over and over. But perhaps we tested it one time too many, perhaps a line got tangled, or perhaps the lasso connection was tied too tightly and didn’t want to release. Either way, I never imagined I’d be responsible for torching a $2000 Les Paul.
As frustrating as that was, I’ll admit that the footage of the flames raining down on the guitar is absolutely mesmerizing and beautiful, especially in slow motion. I put the clip online, and as a bonus added a couple other slow motion shots from the show as well.

Watch the series via iTunes (or get it on Amazon).
Build your own Les Paul style guitar with this Saga LC-10 kit.
Make Your Own Turbine Jet Engine (And Then Put It In Your Porsche)

Four cylinder Honda Civic Hatchback doesn’t have enough “get-up-and-go” for your tastes? Maybe it’s time to upgrade to a Steve Saunders-esque V8 Corvette. Or maybe you want to drop some serious cash and get the 16 cylinder Veyron (with its four turbochargers). But no matter how many cylinders it has, your car won’t ever be as cool as one powered by a turbine jet engine.
Typically thought of for airplanes, helicopters, locomotives and army tanks, turbine engines have some interesting advantages over internal combustion: lower weight, increased horsepower and torque, and you can feed them almost anything – the ones I’ve played with were filled with kerosene, diesel, and anything else highly flammable we could find in the garage. They’re reasonably simple machines, mechanically less complicated than a car’s gas engine. But they also come with an hefty thirst, and generate crazy amounts of heat.

For the past ten years, Michael Davis has been building his own turbine jets from parts that he sources online and in junkyards. Based around a standard automotive turbocharger, Davis spent about $150 and four months to get his first unit up and running. His site follows all the trials and errors of building a jet engine this way, and serves as a good guide for anyone interested in playing with loud, powerful jets in their back yard.


Combine his site with this Instructable about building your own jet engine and you should have the full recipe for putting together the ultimate noisemaker.

Now, the fun part. Back in the early 1960’s, Chrysler focused a lot of resources on creating a viable turbine jet engine car. The high point of their push was in 1963 when they released 50 cars to a group of “average” people for real world testing. The results were good, and according to the car’s wikipedia page, the cars logged 1.1million miles over the testing phase and only had 4% downtime. But, hilariously, they were described as sounding like giant vacuum cleaners, a negative point that helped kill the program. Ultimately and unfortunately, the whole program died during the government bail out in the 1970s.
Chrysler also produced a promotional video for the turbine program in classic early-60’s style. Check out the proving grounds they test their cars on – that’s an unusual amount of winding dirt trails for your “average” Chrysler driver, right? If it still exists, I would love to bring a few cars there to test out myself.
Other turbine engine cars pop up from time to time, most recently a few weeks ago on eBay when someone was unloading a Boeing T-50 powered Porsche 928. Complete with flame throwers from the hood of the car. As my pal Steve commented, you have to wonder how long you can drive that thing until the windshield melts… Regardless, it sold for $12,000 – although it was originally listed at $20k.

1982 PORSCHE 928 WITH A BOEING TURBINE ENGINE
TURBINE ENGINES RUN FINE ON DIESEL
POWER STEERING
POWER DISK BRAKES ALL 4
HEATER AND DEF….(BLEED AIR TO HEATER CORE)
NEW PAINT
NEW WHEELS 18″
JVC FM AND CD PLAYER WITH REMOTE
FLAME SHOOTER
17 MPG
OVER 160 MPH
365 HP
700+ FOOT POUNDS OF TORQUE
IT’S A DAILY DRIVER AND A SHOW CAR
USE TO BE NEW
AT LAST AN AIR COOLED 928
How to Pirate A Vinyl Record, And How Vinyl Records Are Made

Vinyl records have a unique place in the world of music media. Aside from their warm analog tone, vinyl is the only popular medium that is nearly impossible to create or duplicate at home – something that can’t be claimed by cassettes, CDs, DVDs, and certainly not mp3s. Not to be an apologist for piracy, this inherently creates more value for recorded music than using an easily reproducible medium (be it physically or digitally) does. But as we all know, digital is the present and the future, and I am not complaining about that at all; one look at my iTunes playlist and you’ll know what I mean.
A while back, the site qj.net ran a piece on how to “pirate” a vinyl record using normal silicone casting materials. Sadly, the link is broken, but thanks to the Wayback Machine, I’ve pulled the archived copy up and am attaching it here for posterity:
Posted May 14, 2006 at 06:49AM by Anna S.Listed in: Misc. Gadgets
So you thought you’ve pirated everything huh?
Step 1

Using the wooden strips, make a box around the glass plate. Seal off the edges using the window cement. Make sure everything is air tight.
Step 2

Place your record inside the box making sure that the portion to be copied is facing upward. Squeeze in some window cement to mark where the hole in the record is.
Step 3

Mix the silicone (Smooth On OOMOO 30 or OOMOO 25) for about 3 minutes before pouring in to the mold.
Step 4

Pour in the mixture. Start from one corner and let it fill-up the mold to about half a centimeter. Make sure it’s even. Let it dry for 6 hours.
Step 5

Peel off the silicone from the cast. Cut off the excess using a cutter.
Step 6

Pour the liquid plastic (Smooth On Task #4) on top of the silicone cast.
Step 7

Make sure that nothing spills over the round form. You can also brush off any air bubbles that might occur.
Step 8

Carefully loosen the plate from the silicone form. Using a drill press, bore a hole through the center of the plate. You can use the silicone form as a template to make more copies.
There you have it. Your very own pirated record.

(QJ translated this from the German site Zeit.de, also unavailable except via archive)
How well does this work? To be seen… the next step is to rip a vinyl record (pretty easy to do using a USB turntable), then cast a copy of it using this technique. Rip the copy, compare waveforms and look for any major discrepancies. That’s an upcoming project.
==========

Now, if you haven’t seen the exact process in how records are created, you might be surprised at how much manual cooperation is involved. From inspecting the metal pressing discs and the lacquered masters, to centering the disc for hole punching, you’ve got sweet old ladies who are meticulously making sure your music will sound great. And the actual assembly process, even with automation, is like something you’d see in a Detroit auto maker’s factory: heavy hydraulic equipment pressing hot platters into precision shapes, rotating slicers, and vacuum-assisted label placers.
You can watch the whole process happen, courtesy of Discovery’s “How It’s Made” — part two is where things get interesting.

Hi, I'm Mike. I’m the executive editor of Make: magazine, and host of Discovery channel’s Punkin' Chunkin' and Catch It Keep It, TV shows where I build and explain crazy machines that crush stuff, blow things up, shoot fire, all in the name of science.
I've previously worked at Wired and ReadyMade magazines, writing about how to utilize new technology in our everyday lives.
This site is where I keep a list of instructions for fun projects I've done, am working on, or draw inspiration from. I encourage everyone to get involved — get up and do something!