Quick and Easy Way To Clean Your Pizza Stone: Power Sander
Pizza stones tend to get dirty quickly – spill some sauce or cheese onto the 600ºF surface and it almost immediately turns into a burnt black mess. I usually clean my stone passively, scraping any excessive residue with a dough scraper and letting the high heat do the rest of the work for me.
At a certain point, a brown and black stone becomes unsightly and may even affect the moisture-absorb cooking aspect that a clean stone provides. When you reach that point, do NOT wash it in the sink or dishwasher. The material that stones are made from are porous and sand-like and will absorb and store the moisture inside, even after letting it dry for a period of time. That internal moisture will turn to steam and crack or break the stone as it expands.
When I bought my stone a few years ago (which I love, by the way – it’s outlasted all previous stones I’ve owned, and cooks great with the 5/8″ thickness), it came with a photocopied “Use and Care” sheet that suggested using a belt sander to clean the stone periodically. I decided to test this out with a palm sander.
The results were interesting: the surface returned to a smooth and clean feel, but it looked as if there may be a top veneer layer that gives an even appearance. Some of the spots that I sanded seemed to show a larger grain underneath as I sanded. I’m not concerned about this in any way at all. But I am going to keep my eye on a small crack that seems to be developing.
Disassemble Your Lumix Digital Camera To Clean Dust Off the Sensor
(Comments posted on the video page indicate that this procedure works for many of the Panasonic digital cameras–happy cleaning!)
My Panasonic FX37 is a great camera. Fast, wide-angle lens, (f/2.8, 25mm equivalent) in a compact package with all the modern features (image stabilization, HD video, facial recognition, etc). And it takes really nice photos. However there is one downside: its sensor seems to attract dust, which is especially noticeable when zooming in on a bright object (such as the sky).
I’m not sure if this is a matter of the case being poorly sealed compared to other pocket cameras, but it is frustrating. Thankfully, the remedy is fast and simple: by removing a few small screws, you are able to access the sensor inside the camera. A few bursts of air and a quick reassembly is all it takes to be snapping photos like the camera is brand new.
I made a quick video tutorial of how to access and clean the sensor– the entire process takes less than 10 minutes. Make things smoother on yourself by getting the tools together before starting the process. You don’t want to leave the case open any longer than necessary.
Here’s what you’ll need: Mini screwdrivers • Blower or compressed air •Lint-free cloth • Receptacles for screws and parts • Clean workspace.
Be careful disassembling your camera. This will almost surely void your warranty (a warranty that probably can be used to have the company clean the sensor for you), so be certain that you are willing to risk breaking your camera forever. I take no responsibility for any damage incurred following these instructions. Now, go clean that sensor!

More Geektastic Papercraft Projects: Iron Man Mark IV and Geoff Peterson

The upcoming Iron Man sequel features an updated suit of armor, and now you can make a miniaturized paper version for yourself. It is a bit more complicated than beginner papercraft projects and doesn’t have a list of instructions, so make sure to keep your printer ink refreshed if you have to start over. Get the printout here.
Also, the Mark V armor (the suitcase one – how much must that weigh??) is papercrafted too. Check it out.

Speaking of Iron Man: check out the article I wrote in the current issue of WIRED magazine: Geek Justice League: Caped Crusader Billionaires We’d Like to See. A fun piece to go along with the soon-to-premiere Iron Man 2 movie. As a big comic fanatic growing up, getting to write about superheroes is still amazingly fun. And I love that Wired illustrated the “geeks” very closely to the descriptions I submitted for them. Enjoy!
A simpler but no less geekily awesome paper project is the Geoff Peterson “Cubee.” Anyone who’s been keeping up with Mythbusters’ Grant Imahara or watching the Craig Ferguson show know that Grant recently made a robot sidekick for Craig, named Geoff Peterson. It’s a work of comedic and robotic art. And now you can pay homage to a great late night talk show moment by making your own paper version. Get the file here.

Why You Shouldn’t Use Your iPhone for RC Airplane Aerial Video
Combining RC aircraft and video cameras is as instinctual as putting berries on your cereal. And as manufacturers come out with higher quality lenses and sensors, while shrinking camera size and weight, some pretty impressive (and expensive) rigs have been assembled to capture aerial footage.
However the iPhone does not seem like a good fit for a project like this. Light: yes. Fragile: very. Important to your daily life: completely. Watch as this unlucky (or perhaps, very lucky) fellow flies his iPhone-equipped airplane into a light post. Hilarity!
When I tried to shoot some nice aerial video from my iPhone equipped rc-plane I accidently crashed into a lamppost.
My aeroplane was totally smashed but my iPhone fortunately survived and captured everything on video!I’m flying over Löberöd in south of Sweden.
Of course, done right the footage from RC aircraft can be downright cinematographic.
This video, while not aerial, shows the workings of a pretty badass flying rig equipped with a Canon G10, and shot on one of my favorite DSLRs for video, the Canon 7D (although I’m starting to like the T2i a lot – the price and quality is undeniable).
Harbor Freight Coupon Deals from Car and Driver Magazine

Being a regular reader of the Harbor Freight catalog I quickly noticed their signature look in the back pages of Car and Driver magazine. I also noticed the listed prices were better than the regular ones in their monthly mailer. And on top of that, the coupons don’t expire until mid-July. A pretty nice reward for the Car and Driver readers.
Here’s a scan of that ad; print it out on your company’s color laser printer and see if it works at your local HF shop. The jack stands and creeper are looking pretty useful for the project I’m working on right now…
Photos and Video from Mexicali’s 7.2 Earthquake, and How To Build Your Own Seismograph

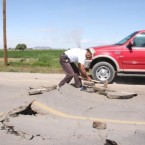


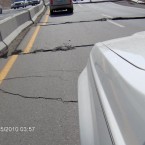

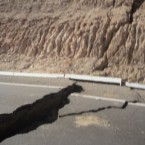


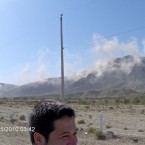
The Baja California Earthquake on April 4, 2010 left a fair amount of localized destruction and wide-spread shaken nerves in its wake, but thankfully it was not nearly as devastating as could have been. At 7.2 on the Moment Magnitude Scale (an updated, more precise measurement than the Richter scale for large earthquakes), the quake released more energy than the Loma Prieta earthquake that knocked down many parts of San Francisco and Oakland in 1989.
This was a butt-kicking earthquake. It lasted for approximately a minute (compared to 10-15 seconds for Loma Prieta). The power of it can be seen through some phenomenal photos taken during and just after its occurrence – Route 5 heading south of Mexicali has developed massive cracks, and the dust rising off the surrounding mountains show how an earthquake this size treats the surface of the planet like someone trying to shake the sand out of a beach blanket.
Fortunately, the area where the earthquake occurred is not a densely populated metropolitan zone such as San Francisco or Los Angeles. Mexicali and its surroundings are largely agricultural, with a desert that stretches far beyond. The principal buildings are low-rise, and there is no major transportation/freeway network in the area; disruptions will be quickly re-routed. Incidentally, every time I’ve passed through the city I’ve managed to get completely lost, and once even had an early-morning police escort to the border. But that’s unrelated 😉
Here’s how seismometers work, and how to build one of your own:
If You Can Cut and Fold Paper, You Can Make These Papercraft Pizza Toys

Another fun project to sneak in at the end of a slow day in the office: Pizza Papercraft
Print these pizza-based papercraft templates out (use the color laser printer to really make them sparkle), cut as indicated (an exacto knife and the metal ruler borrowed from the art department work well), fold in the right spots (I like to crease the straight lines with the back of the exacto blade to get a nice sharp corner) and ta-da! everyone at work will know that you love pizza when they see your adorable paper pizza toys on your desk.
— —————-
The first project is from a Tokyo-based Italian restaurant called Napule. The papercraft is an anime-esque pizza guy holding a pizza with a knowing wink. What does he know? That you love pizza. And that you just got paid for an hour of your time folding him together.


I found this on maurusso.com
(Interesting info: the pizzaiolo at Napule used to be Hisanori Yamamoto – winner of the 2007 World Cup Pizza Championships in Naples, Italy. He now runs Pizzeria Da Isa.)
——————
The second project is a funny one: Papercraft McDonald’s Pizza in a pizza box.
This one folds together similar to the boxes that tormented any of us that worked their way through high school and college making pizzas. And if you’re halfway decent with Photoshop or Illustrator, you can tweak the image on the pizza box to be anything you want, instead of the disgusting failed attempt to make pizza by one of the worst food corporations ever.
I brought some vinyl records home from Italy once in a box I kept from a place in Naples – it had a great design on it, and if I can find the box I’ll scan it and post the image here for you to use.

I found this on Tektonten who also have a similar Pizza Hut Darth Maul papercraft project.
——————
Nothing overly complex about these projects – I’d like to see more pizza focused paper projects though. I’ve got a prize for whomever comes up with the best papercraft wood-fired pizza oven by the end of April. 🙂
Free Six-Piece Screwdriver Set from Harbor Freight Tools

Click the image to open in another window, print the coupon, stop by your local Harbor Freight and enjoy a six-piece screwdriver set for free.
From the pixelated image on the coupon, these screwdrivers look pretty cheap (of course), but sometimes a cheap screwdriver is just the tool you need. Like when you get mad and you need to throw something – don’t waste a nice Craftsman on your short temper.
And if you can get there in the next couple days, bring this coupon for a free LED flashlight for an added bonus. It expires March 24.
If you’re looking for a good deals on name-brand tools, check out Amazon’s Tools & Home Improvement Value Center. A grab bag of discounts on quality goods. One example: Milwaukee 18v cordless circular saw w/o battery: List $312, discounted price $41.55.
Convert Your Gas Go-Kart to Electric

Gas powered go karts are awesome fun – fast and noisy will put a smile on the face of any driver. But the undeniable torque available from an electric motor gives two advantages: insane acceleration and kick-ass hill climbing ability.
A quick instructables from a couple years back has info on retrofitting your gas-powered go-kart to run with a motor, battery and electronics. Turn it into a silent speed machine!
Motor:
Type: Series Wound DC Motor
Max Current: 300A
Cont. Current: 100A
Voltage: 36
Max HP: 15
Cont. HP: 5
Length: 14″
Diameter: 7″
Weight: 30Lbs
Controller:
Alltrax Series Wound Brushed DC Motor Controller
Max Current: 300A
Cont. Current: 100A
Max Voltage: 50V
Min Voltage: 20V
Throttle Type: 0-5k
Batteries:
Lithium Phosphate 42V/33AH system
Capacity (WH): 1.3KWH
Voltage: 42V
Capacity (AH): 32AH
Max Current: 800A
Cont. Current: 400A
Weight: 28Lbs


How does electric stack up to gas? The Mythbusters built and raced an electric go-kart against a gas powered one. The electric components (motor, batteries) doubled the weight of the cart, but even with that, the acceleration easily beat that of the gas version. With some tweaks, they felt they’d be able to have gotten the top speed up to that of the gas engine, too.
A user video of a converted racing go-kart shows the speed capabilities:
Print and Fold Functional Paper Pinhole Camera

I’m a fan of projects that you can do at your work desk – print on the office printer, cut out with scissors and an exacto, and glue/tape together. The Dirkon paper pinhole camera might be the pinnacle of this type of project. This thing is cool – it’s a fully functional pinhole camera that looks like a papercraft SLR. It uses standard 35mm film, and actually advances the film. It has a makeshift “shutter release.” Maybe best of all, it looks super cool – the assembled version is a great decoration for your camera shelf or desktop. It’s been around for a while; I put one together a few years back myself.
The original instructions are in Czech, but have been translated with assembly tips. There are a couple sections that leave some questions, but use some intuition and it all comes together.
If you plan to use this for photography, you’ll need to use cardstock when printing it out – double-check that it doesn’t let light through (if so, line the inside to eliminate all light). Otherwise, standard xerox paper will be just fine.

Here’s the main page with writeup, notes and tips: Dirkon Pinhole Camera
This is the PDF to print out.
And while at it, check out the Rubikon 2, another print-and-fold camera that is an evolution of the Dirkon.
The pinhole.cz site also has some great information about determining exposure time for pinhole cameras.
Finally, get inspired by checking out Flickr pics of other Dirkons and the photos they create.


Hi, I'm Mike. I’m the executive editor of Make: magazine, and host of Discovery channel’s Punkin' Chunkin' and Catch It Keep It, TV shows where I build and explain crazy machines that crush stuff, blow things up, shoot fire, all in the name of science.
I've previously worked at Wired and ReadyMade magazines, writing about how to utilize new technology in our everyday lives.
This site is where I keep a list of instructions for fun projects I've done, am working on, or draw inspiration from. I encourage everyone to get involved — get up and do something!